Making a Spraycan
A quick note about the practicals...
Remember to use Mozilla Firefox to do these practicals. Coding should be done in VS Code or Notepad++
You do not have to run every bit of code in this document. Read through it, and have a go where you feel it would help your understanding. If I explicitly want you to do something, I will write an instruction that looks like this:
This is an instruction that tells you something to either think about, or do.
Shortcuts: Part 1 Part 2
Special Session for the GIS and GeoParticipation Summer School held at Olomouc, Czechia
Making a ‘Spraycan’ PGIS Interface with Leaflet, Turf and Firebase.
For the second practical session of the day, we will be creating our own ‘spraycan’ PGIS interface, which will allow us to collect data about vague geographical concepts whilst avoiding the limitations caused by reliance on geographical primitives (e.g. points and polygons).
This is quite a complicated task, and quite advanced, but we wanted to teach you something that would be useful, rather than simply how to do something like add points to the map, which would be easier, but much less useful!
This is what we are aiming for:
Have a go with the above spraycan interface to make sure thart you understand how it works
This practical exercise is split into a series of steps - there are five ‘main’ steps that demonstrate how to make a simple spraycan interface, followed by two ‘optional’ steps that take things a little further and show you how to add a ‘clear’ button to the map, and one to hook up your interface to a database.
The idea is that everyone should try to complete the first five steps, with the remaining two available for those who finish early, or want to go a little further.
Here we go…
Part 1
The Basics of JavaScript
Before we can do any meaningful programming, there are a few interconnected basics that you need to know. Read over these just so you have the gist, then move on. Don’t worry if it doesn’t quite make sense right away, once you start writing some code it will all become clear - I promise!
Comments:
It is normal when writing code to include comments that explain exactly what you are doing and why. Comments are simply bits of code that are ignored by the JavaScript interpreter. This is important as it makes your code readable to others as well as providing a valuable aide memoire to yourself - you’ll be amazed how alien your own code can seem when you haven’t looked at it for a while!
There are two broad types of comment in JavaScript :
Multiline comment (should be used for sections of code to describe what they do, particularly functions):
/**
 * Everything here is a comment.
 */

/*
 Everything in here is a comment.
*/

/* Also works like this */
Single line comment (should be used for every individual line to explain what it does):
// This is a comment
You will also notice that the comments in the broader HTML part of the web page look like this:
<!-- This is a comment -->
This does exactly the same thing - it is just different because it is a different programming language!
As a rule of thumb, well-written code should be roughly one-third code, one-third comments, and one third whitespace. Programmers call this the Rule of Thirds. Whilst this doesn’t affect the functionality of the code, it makes it much easier to read, and I promise it will save you a lot of time later!
The JavaScript Console
Another thing that we need to get familiar with before we start programming is JavaScript Console, this is the most important tool available to a programmer when writing an interactive website - we are using Firefox today instead of other browsers because it has (in my opinion…) the best console.
When programming, it is often handy to be able to see what your code is doing, or to make your code print out values that it knows for testing purposes. For those times, there is the JavaScript Console, which is built into most browsers (but the Firefox one is best). You can make your code write things to the console in order to test if your code is working, and the console will also report error messages to you in the event that there is a problem with your code. These error messages are really useful, and will help you to solve problems with your code very quickly.
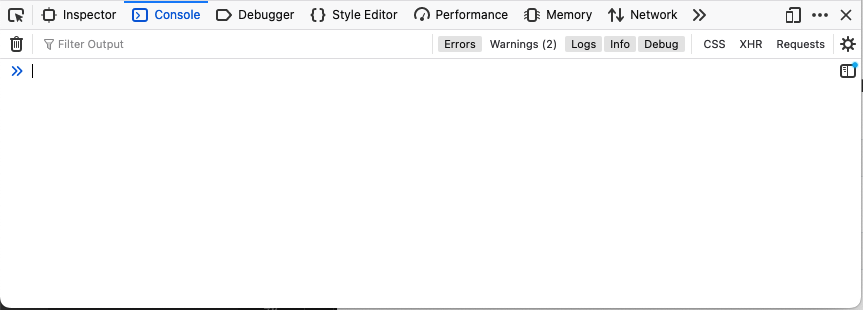
To open the console in Firefox, press Ctrl, Shift + I (Opt, Cmd + I on a Mac), and select the Console tab (if it isn’t already selected). This should open up something like this:
Getting your code to write to the console is as easy as typing console.log(), and putting a message in the brackets. For example, if we included this in our code…
console.log("Hello World!");
… then JavaScript would print…
Hello World
…into the console!
The console will also show you Error Messages if anything goes wrong with your code. Error Messages will tell you what is wrong and even which line of your code has the problem, so the JavaScript console is always the first place thet you should look if something isn’t working - it will often tell you the problem straight away, and even which line of your code is causing it!
Variables:
Variables are containers in which you can store values - they are used in all programming languages. You start by declaring a variable, which you do with one of three keywords: const, let or var; followed by any name you want to call it.
To keep things simple, we will only use const and let - and here is when you would use them:
const(constant) should be used if you are not planning to change the value in the variable after the initial definitionletshould be used if you are planning to change the value in the variable after the initial definition
So, for example, if I wanted to create a variable that held my name, I might call it myName like this:
let myName;
I can then store a value in it using the = operator, like this (we look at operators in a second…):
myName = "Jonny";
or, for efficiency, do both at once:
let myName = "Jonny";
Note: every JavaScript statement has to end with a `;`, if you forget this, your script probably won’t work, or you may get some unexpected results!
Variable names can’t have any spaces or characters that are not a-z, A-Z or 0-9 in them and they cannot begin with a number. By convention, variables in JavaScript are normally written in camelCase (as opposed to upper case or lower case), which is demonstrated above. In camelCase, the first word should start with a lower case letters, and all subsequent words should start with an upper case letter (making sure that there are no spaces!). Here are some examples:
camelCaseaReallyLongVariableNameshortshort2jonnyHuck
Conversely, here are some invalid variable names:
12bigFishmy Lovely variable
You can change the value in a variable that was set using let at any time, simply by setting it again using the = operator:
myName = "Jonathan";
Did you notice that you don’t declare the variable with the let keyword this time? It’s because you’ve already done it the first time around, so the variable already exists! If you try and re-declare it, you will get an error. Also remember that if you declare it with const then you cannot change the value and you will get an error if you try - this is important as it prevents you from accidentally overwriting variables when your code gets longer and more complex!
Note that you can print variables directly to the console to check that they contain what you are expecting (which is very useful when you are testing your code or trying to find an error), for example…
console.log(myName);
… would print…
Jonathan
Simple!
Take a second to make sure that you understand variables - if you aren’t sure - ask!
Functions
Functions are a way of packaging code that you want to reuse, so that whenever you want the functionality of that code you can call the function with it’s name, rather than constantly rewriting the entire script. You have already seen one function in this practical: console.log() is a JavaScript function that writes something to the JavaScript Console.
Some functions (e.g. console.log()) already exist in the JavaScript, or are brought in with libraries that you load (Leaflet, for example, provides lots of functions for you to use). Others are created by you, and in fact, most of your code will be written in the form of functions. Fortunately, creating a function is not very hard, here is one now:
 /**
  * A function to return my name
  */
 function whatsMyName(){

 	// store my name in a variable as a String
 	const myName = "Jonny";

 	// return that variable
 	return myName;
 }
Note: how the code within the function is indented, this helps to make the code readable!
Here are the components of a function:
- The keyword
functiontells JavaScript to make a function - The function needs a unique name (again in camelCase)
- Any arguments for the function go inside some parentheses (
( )). I will talk about these in a minute… - The contents of the function go between the curly braces (
{ }) - the contents are indented to make them easier to read. - The optional
returnkeyword tells the function to output (return…) the result (myNamein this case). Some functions just do something (e.g.console.log()) and don’t actually need to return a value, but if you do need to return a result thenreturnis how to do it!
Make sure that you can identify all of those parts in the above example. If not - ask!
It is important to understand that writing a function like is shown above creates the function, i.e. it means that JavaScript knows what to do when you tell it to run. The function does not actually do anything until you tell the browser to use it - this is called calling the function, and you do this simply by writing the name of the function, followed by the parentheses:
const result = whatsMyName();
Take a second to remember and understand the difference between defining and calling a function. Defining the function simply creates it, it won’t actually do anything until it is called.
In this case, the function whatsMyName() will run, and then whatever value is passed in the return statement will be stored in the variable result.
 /**
  * Return my name
  */
 function whatsMyName(){

 	// store my name in a variable as a String
 	const myName = "Jonny";

 	// return that variable
 	return myName;
 }

// get my name from the function and store it in a variable called result
const result = whatsMyName();

// write the contents of the result variable to the console
console.log(result);
Make sure that you understand how that works, if not, ask!
Arguments for functions
As useful as the above function is, most functions require values to be given to them, with which they can do things. Values are passed to functions in the form of arguments, which are enclosed within the parentheses ( ( ) ) of the function and are separated by commas if there are more than one:
/**
 * Add two numbers together
 */
function addUp(arg1, arg2) {
  return arg1 + arg2;
}
In this case, you could type:
console.log( addUp(2,2) );
And you would print out 4!
Phew! So there you have it: comments, the JavaScript Console, variables and functions: all you need to get stuck into some serious JavaScript!
Let’s go…
Part 2
Making the Spraycan
1. Making a blank Leaflet Map
As we only have a relatively short time, we will ‘hit the ground running’ and start off with a template:
Open a new file in VS Code, paste in the below snippet and click Ctrl+S to save it as a new file called
spray.html
<!DOCTYPE html>
<!-- everything in here is interpreted as HTML -->
<html>
<!-- everything in here is the 'head' of the HTML document, this is used for importing libraries,
setting styles, and other setup functions that should happen before the page loads -->
<head>
<!-- tell the browser what character encoding you are using -->
<meta charset="UTF-8">
<!-- Set the title for the page -->
<title>Step 0: Blank Leaflet Map</title>
<!-- import the Leaflet styles and libraries -->
<link rel="stylesheet" href="https://unpkg.com/leaflet@1.5.1/dist/leaflet.css" />
<script src="https://unpkg.com/leaflet@1.5.1/dist/leaflet.js"></script>
<!-- everything in here is CSS - this determines the appearance of the web page-->
<style>
/* set the web page to full size */
html, body {
padding: 0;
margin: 0;
width: 100%;
height: 100%;
}
/* set the map to full page */
#map {
width: 100%;
height: 100%;
}
</style>
<!-- everything in here is JavaScript - this is used to add functionality to the web page -->
<script>
/* these are global variables - they can be accessed fron anywhere in your code */
let map; // this variable represents the map object
/**
* Initialise the map (called when the body has loaded)
*/
function initMap() {
// this is a variable that holds the map
map = L.map('map');
// set the map to use the above coordinates, and to zoom level 16
map.setView(L.latLng(49.595412061278395, 17.260030326075523), 16);
// this is a variable that holds a reference the tiles that will be used for the basemap
L.tileLayer('https://{s}.tile.openstreetmap.org/{z}/{x}/{y}.png',
{ attribution: '© <a href="https://www.openstreetmap.org/copyright">OpenStreetMap</a> contributors' }
).addTo(map);
}
</script>
</head>
<!-- everything in here is the 'body' of the HTML document - this is the actual content. In our case,
this is simply a single 'division' that will be used to contain the map. We have also defined an
event listener, which means that when the body has fully loaded, the browser will automatically call the
'initMap()' funcrtion in JavaScript. This is important, as if the function ran before the body had loaded,
it would have nowhere to put the map and so would fail. -->
<body onload="initMap();">
<!-- a division to hold the map -->
<div id='map'></div>
</body>
</html>
Find the file that you have just created in Windows Explorer (i.e. find the file) and open it in Mozilla Firefox (not Chrome, Edge or anything else). The easiest way to do this is simply to open up Firefox and drag the file into the window.
If all has gone to plan, it should look something like this:
Take a second to look through the code that you have - make sure that it all makes sense in light of the lecture material. Remember, if you have any questions, just ask!
2. Engaging with Mouse Events
Now that we have our map, we can start to add some functionality to it using JavaScript. As we saw in the lecture, much of the power of JavaScript lies in the use of events, in which the browser will detect the user doing certain things (such as clicking on the map, zooming or panning the map, pressing a button, and so on), and will report this to JavaScript.
You, the programmer, can catch these events by setting up an event listener, which attaches a given type of event to a given JavaScript function, meaning that when the browser detects the specified event, it will respond by launching the function. As you can see in the above snippet, we have already used the onload event (fired when the page has finished loading) to launch the initMap() function, which loads the Leaflet map into the div.
Make sure that you can see how this event works in your existing code before moving on. If you are not sure, ask!
Similarly, I can create a button like the below, and attach a listener to its onclick function in order to make a button pop up:
Click the below button:
That worked because Buttons in HTML know to generate an event called onclick, which is fired every time someone clicks on it. I have the following JavaScript listening for that event, meaning that as soon as someone clicks on the button, the onclick event is fired and the function that I have set as the listener is called. Here is the code that is fired by the onclick event:
alert('You clicked my button!');
alert is a function that generates a small box containing a message that you pass to it as an argument, which is exactly what you see when you click the button. Simple!
Leaflet maps have lots of events that we can listen for in order to add functionality.
Check out the list of all of the options here
As you can see, we can fire an event when pretty much anything happens to the map! In our case, we are particularly interested in the ones known as Interaction Events, as these are the ones that refer to things that the user does (e.g. when they click on the map).
In Leaflet, we can easily bind listeners to events using the map.on() function. Consider the below:
                // add listener for click event on the map
                map.on('click', onMapClick);
Here we are asking Leaflet to bind the function onMapClick() (which does not exist yet) to the event click, which is fired every time someon clicks on the map.
Add the above snippet to the end of your
initMap()functionNow add the below snippet after your
initMap()function (but still inside the<script></script>tags)
            /**
             * Click listener: Add a marker to the map at the clicked location
             */
            function onMapClick(e) {

                // create a marker and add to map at the clicked location
            		alert("You clicked on me!");
            }
Refresh your web page and click on the map - if all has gone to plan, you should have something like this:
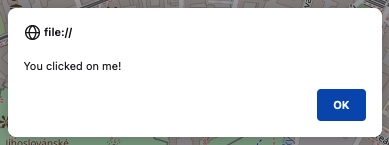
If so, well done!!! You have your own click listener!
Now let’s give it a bit of an upgrade, and add a marker to the map. To achieve this, we will comment out the alert() statement, and replace it with a statement to add a marker to the map at the click location:
            /**
             * Click listener: Add a marker to the map at the clicked location
             */
            function onMapClick(e) {

                //alert("You clicked on me!");

                // create a marker and add to map at the clicked location
                L.marker(e.latlng).addTo(map);
            }
Here, you can see that we are getting the location of the click on the map using the e.latlng value, which contains the geographical coordinates of the click event. e is an object that represents the event, containing a range of information such as the time at which it took place and the location of the click. The .latlng property of the e object simply contains the geographical coordinates of the click! We simply pass these to the L.marker() function to create a marker at this location, and then use the .addTo() function to make it appear on the map.
Update your
onMapClick()function so that it looks like the above
Now, if all is going to plan, you should have something like this:
If you are struggling to get this to work - feel free to check out the solution here!
Not bad eh!
3. More Mouse Events
Capturing click events is all that you need for most applications, but our spraycan interface is a little more complex, as we need to be able to tell when the user is holding down the mouse, and follow it around the screen. For this reason, we will get rid of our click listener and replace it with three new ones:
mousedownfires when the mouse button is pressed down over the mapmousemovefires when the cursor is moved over the mapmouseupfires when the mouse button is released over the map
Using the combination of these three events, we should be able to construct our own spraycan interface. However, before we can do this, we must prevent the map from being dragged (as we want to draw on the map using the same interaction)
Add the below snippet to your
initMapfunction to disable dragging on the map:
                // disable dragging on the map
                map.dragging.disable();
Add the below three functions to your code (make sure that they are inside the
<script></script>tags, but outside of the other functions)
            /**
             * Mouse Down listener: Start spraying
             */
             function onMouseDown() {

            }


            /**
             * Mouse Move listener: Update the current location
             */
            function onMouseMove(e) {

            }


            /**
             * Mouse Up listener: Stop spraying
             */
            function onMouseUp() {

            }
Now, comment out your statement that binds the
onMapClick()function to theclickfunction, and replace it with three more statements that bind the above three functions to the appropriate events.Add some
console.log()statements to each of the functions to enable you to test them out. Once you are satisfied, comment them out again.
When you are satisfied that they work, we can start putting them to work. Let’s start with onMouseMove(). Interestingly, unlike the click event, mousedown and mouseup are not accompanied by a geographical location, so we must use mousemove (which does include a location) to keep track of the mouse:
let currentMouseLocation; // this keeps track of the current mouse location while we are spraying
Firstly, add a new variable called
currentMouseLocationimmediately after the line where you create themapvariable (approx. line41).Then, update your
onMouseMovefunction to look like the below:
            /**
             * Mouse Move listener: Update the current location
             */
            function onMouseMove(e) {

                // update our record the current mouse location
                currentMouseLocation = e.latlng;
            }
These two steps have created a global variable called currentMouseLocation. This is then constantly updated with the current location of the mouse on the map (using geographical coordinates). With this approach, we can easily access the current mouse location at any time, simply by looking in the currentMouseLocation variable.
Now we can start adding some markers to the map again. This time, we are going to repeatedly add a marker to the map at the mouse location as long as the user has the mouse button pressed down. We will achieve this using a recursive function called spray() that:
- adds a marker to the map
- sets a timer to wait for a given period
- calls itself again (repeating the above steps)
A function that calls itself is known as a recursive function, this is a neat way to keep adding markers to the map again and again until the mouse is released! To make it stop, we simply need to cancel the current timer, which stops spray() from calling itself, and so ends the cycle of marker placement. Here is how it works:
Firstly, add another global variable called
loopTimer(just as you did above)Secondly, add your recursive function by pasting in the below snippet (remember - this must be inside the
<script></script>tags, but outside the other functions!):
            /**
             * Recursive function that add a marker to the map every 12ms
             * (remember: a recursive function is one that calls itself)
             */
            function spray() {

                // create a marker and add to map at the current mouse location
                L.marker(currentMouseLocation).addTo(map);

                // wait 12ms then make a call to this function again
                loopTimer = window.setTimeout(spray, 12);
            }
Thirdly, edit your
onMouseDownandonMouseUpfunctions according to the below snippets:
            /**
             * Mouse Down listener: Start spraying
             */
             function onMouseDown() {

                // start spraying onto the map (using ther spray() function)
                spray();
            }
            /**
             * Mouse Up listener: Stop spraying
             */
            function onMouseUp() {

                // cancel the current timer, ending the repetition in the recursive function
                window.clearTimeout(loopTimer);
            }
Can you see what this is doing - the workflow for a user pressing and dragging the mouse is therefore:
- The user presses the mouse button, the
mousedownevent is fired, and so theonMouseDownfunction is called. - This makes a call to the
spray()function, which adds a marker to the map at the current mouse location (which it gets fromcurrentMouseLocation) and then sets a timer for 12ms, after which another call will be made to thespray()function. - Step 2 repeats (adding more and more markers to the map) until the user releases the mouse button, at which point the
mouseupevent is fired, and so theonMouseUpfunction is called. This useswindow.clearTimeout()to cancel the timer, ending the cycle of calls tospray(), and so stopping any more markers from being added to the map
Refresh your map and try it (hold down the mouse button and drag the cursor across the map) if all has gone to plan, you should have something like the below:
If you are struggling to get this to work - feel free to check out the solution here!
Have a good look at what you did and make sure that it makes sense - if you are not sure, ask!
4. Simulating Spray with a Random Offset
OK - so now we are able to add markers to the map as our mouse moves, we simply need to add a random offset to them in order to give the appearance of the spraycan!
To do this, we will make use of the turfjs library, which contains a range of GIS functionality in JavaScript. Specifically, we will replace the line that adds a marker to the map at the current mouse location with some new code that follows these steps:
- Create a
turfpoint object - Buffer this point to the desired radius of our spray
- Calculate the bounding box of this buffer
- Calculate a random point within this bounding box
- Add a marker at that location (instead of the mouse location)
The effect of this is that we will start adding markers at random locations within a box of defined size around the mouse location, instead of exactly on the mouse location (and all without having to do any maths!).
Note that, in contrast to map-me, this approach actually gives a square distribution of spray paint (rather than circular) - we are using this approach as it is quick and simple for the purposes of this class, and in practice you can only tell the difference if you spray continually in one location for a long period of time!
OK - here we go…
comment out the
L.marker(currentMouseLocation).addTo(map);line in thespray()function
1. Create a turf point object
Before we can use the turfjs library, we must import it into our web page (so that the browser can see it). This simply tells the browser to go and get the turfjs library and read it, meaning that all of the turf functionality will be ready for us when we need it.
To do this, add the below HTMLsnippet into the head section of your HTML file (i.e., within the
<head></head>tags, but NOT within any other tags)
        <!-- import the TurfJS library -->
        <script src="https://cdn.jsdelivr.net/npm/@turf/turf@6/turf.min.js"></script>
To be able to use the turfjs functionality, we have to create a turf.point() object at our desired location. Here we run into one of the peculiarities of web maps - web mapping platforms (including Leaflet, Google Maps etc.) describe geographical coordinates in the form latitude, longitude. However, this is actually backwards (y, x) and pretty much everything else (including turfjs) describes them in the order longitude, latitude (x, y). For this reason, we have to reverse the coordinates when we convert them to a turf object:
                // make a Turf point object (note that turf uses [longitude,latitude])
                const point = turf.point([currentMouseLocation.lng, currentMouseLocation.lat]);
Add the above snippet to the top of your
spray()function
2. Buffer this point to the desired radius of our spray
Now that we have a turf object (a point representing the current mouse location, stored in the variable point), we can start doing some GIS operations on it. First, we will buffer the point to create a circular polygon of a specified radius (the desired size of the spray pattern, 40m in this case ) around it:
                // buffer that point to a the desired radius of the spraycan
                const buffered = turf.buffer(point, 40, {units: 'meters'});  // note US spelling
Add the above snippet to your
spray()function, immediately after the previous one
3. Calculate the bounding box of this buffer
Next, we want to convert the circular buffer polygon into a square (which is the shape required to get our random location in the next step…). To do this, we simply need to pass the buffered variable to the turf.bbox() function:
                // get the bounding box for the buffer
                const bbox = turf.bbox(buffered);
Add the above snippet to your
spray()function, immediately after the previous one
4. Calculate a random point within this bounding box
Can you see how this works? Each step calls a function and passes the variable created in the previous step. If you don’t get it, ask!
Next, we want to create a random point within the square polygon that we created in the previous step. We will achieve this by passing the bbox variable to the turf.randomPosition() function
Add in the statement necessary to complete this step, storing the result in a variable called
randomPosition
5. Add a marker at that location
Finally, we simply want to add a location at our new location, once again reversing the coordinates to reflect the latitude longitude order expected by the Leaflet library.
                // create a marker at the random location (note that leaflet uses [latitude,longitude])
                L.marker([randomPosition[1], randomPosition[0]]).addTo(map);
Add the above snippet to your code to achieve this - this should be immediately before your line beginning
loopTimer...Now refresh your page and give it a try
If all has gone to plan your markers should now have a random offset from the mouse location:
If you are struggling to get this to work - feel free to check out the solution here!
5. Symbology
Phew - this is getting complicated! Fortunetely, this last step is the easy one - all that we have to do is replace the default Leaflet markers with somewthig that looks a little bit like spray paint!
To do this, we simply replace our L.marker statement with a L.circle statement. Just like it sounds, this draws a circle onto the page, and we can simply style it to look like we want using the options - see below:
                // create a circle at the random location (note that leaflet uses [latitude,longitude])
                const circle = L.circle([randomPosition[1], randomPosition[0]], {
                    color: 'none',      // this removes the outline from the circle
                    fillColor: 'blue',   // this sets the colour of the paint dots
                    fillOpacity: 0.5,   // this sets the opacity of the paint dots
                    radius: 8,          // this sets the size of the paint dots
                    interactive: false, // this makes the paint act like part of the basemap
                }).addTo(map);
Comment out the
L.marker...line in yourspray()function and replace it with the above snippet
Now you should have something that looks very much like a Spraycan interface:
If you are struggling to get this to work - feel free to check out the solution here!
Not bad eh!!
Have a play with the settings to change the size and colour of the circles, as well as the radius of the spray pattern itself.
This is the end of the compulsory part of the practical, but if you have finished early, or would like to delve a little deeper, then keep reading…
6. Clearing your Spray (optional)
What we have at this stage is a very basic implementation of a spraycan interface. In the next two sections, we will have a look at how we can extend this to make it a little more functional. Here, we will add a button that allows the user to clear all of the spray from the map.
Firstly, we will need to add a little more CSS and HTML to our web page to define the appearance of the button - I am not going to go into detail on this (and most of it should be relatively self-explanatory), but if you have any questions, feel free to ask!
Add the below snippet to the
<style></style>tags in your HTML file. This determines the appearance and positioning of your button
            /* set the design of the button */
            #clearButton {
                display: flex;
                position: absolute;
                top: 20px;
                right: 20px;
                padding: 10px 5px;
                background-color: #eee;
                border-radius: 5px;
                border-color: gray;
                border-style: solid;
                border-width: 1px 1px 1px 1px;
                text-align: center;
                z-index: 500;
            }

            /* set what happens when you hover over the button */
            #clearButton:hover{
                cursor: pointer;
                background-color: white;
            }
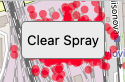
Secondly, update the
<div>...line in your HTML to the following, in order to actually add the button to the page:
        <!-- a division to hold the map -->
        <div id='map'>
            <button id="clearButton" onclick="clear">Clear Spray</button>
        </div>
This is sufficient to actually add the button to the map (try it and see!) - but now we need to make it do something - and for that we need to go back to thinking about events!
There are two things that we need to do here: firstly, we need bind the click listener of the button to a new function (let’s call it clear()). The second step is something that we haven’t had to consider yet, and it relates to spomething called event propagation. In essence, we have added a button on top of the map, BUT when we click on the button, this will still cause a click event to fire on the on the map as well, because the event is propagated down through everything that it underneath the thing that you clicked on. The effect of this is that clicking on the button will also cause the user to accidentally spray on the map beneath the button, like this:
Try it, you should see the same effect!
To avoid this, we need to disable event propagation on the button, meaning that it will effectively block any events from happening underneath it.
We can achieve both of these things using the below statements:
                // add click listener to the button
                document.getElementById('clearButton').addEventListener('click', clear);

                // make it so that the button blocks you from spraying on the map when you click on it
                L.DomEvent.disableClickPropagation(L.DomUtil.get('clearButton'));
Add both statements to your
initMap()function
Now, all we need to do is to implement our clear() function, which simply needs to remove all of the circles from the map. However, at the moment this is not possible because we are not keeping track of the circles as we put them onto the map, we simply add them to the map and forget about them!
What we should really do is to keep a list of all of the circles as we add them to the map, meaning that we can keep track of them so that they can be removed. Fortunately, JavaScript has a structure for keeping lists like this, known as an array. Here is how to use an array to keep track of your circles:
Firstly, add the below snippet to the appropriate location to make a new global variable
let paint = []; // this stores all of our paint
Secondly, add the below statement to the appropriate location in your
spray()function to store the circle once you have made it
                // add the circle to our list of paint
                paint.push(circle);
(the push() function simply adds a new item to the array).
Now that we have a list of all of our circles in our array, we can use a JavaScript feature called a for loop in order to remove each item in the list one by one. Once this is complete, we can simply re-set our paint array to be empty to reflect the fact that we have removed all of our spray:
            /**
             * Clear all of the paint from the map
             */
            function clear() {

                // remove each dot from the map in turn
                for (let i = 0; i < paint.length; i++) {
                    map.removeLayer(paint[i]);
                }

                // empty the paint array
                paint = [];
            }
Make sure that the above makes sense, then add the above function it to your file at an appropriate location; refresh your page and test it
If all goes to plan, you should have something like the below:
If you are struggling to get this to work - feel free to check out the solution here!
Cool eh!
I don’t want to carry on, skip to the end!
7. Connecting to a Database (optional)
Finally, if we are going to use our spraycan interface for a (P)PGIS survey, then we will need to store the data somewhere! There are many different database providers out there that you could use for this purpose, but we will use Firebase by Google.
We do not have the time to go into the details of setting up your database (though you can see instructions here if you want them for the future), so I have set up a database for you to connect to. This is achieved with the below:
        <!-- initialise the database -->
        <script type="module">

            // module imports
            import { initializeApp } from "https://www.gstatic.com/firebasejs/9.8.3/firebase-app.js";
            import { getDatabase, ref, set, push, update } from "https://www.gstatic.com/firebasejs/9.8.3/firebase-database.js";

            // initialize Firebase
            const app = initializeApp({
                apiKey: "AIzaSyARY_IFeix9DO0XVMkURoJsCejczA3J1kU",
                authDomain: "olomouc-12cc7.firebaseapp.com",
                databaseURL: "https://olomouc-12cc7-default-rtdb.europe-west1.firebasedatabase.app",
                projectId: "olomouc-12cc7",
                storageBucket: "olomouc-12cc7.appspot.com",
                messagingSenderId: "891400252972",
                appId: "1:891400252972:web:e3b3f336e4ec2d69e5ab89",
                measurementId: "G-V66NVFVT1L"
            });

            // initialize Realtime Database and get a reference to the service
            window.database = getDatabase(app);

            // expose a function that loads a data point into the database
            window.pushToDatabase = function(data) {

                //load into the database and record the key
                const key = push(ref(database, userName + '/'), data).key;
                // console.log(key);

                // log the database id of this point
                dbIDs.push(key)
            }

            // expose a function to delete a list of data from the database
            window.dropFromDatabase = function(key) {

                // set to null to delete from the database
                set(ref(database, userName + '/' + key), null);
            }
        </script>
Add the above code to your file. Note that this is a separate set of
<script></script>tags, and so needs to be inside the<head></head>tags, but not inside any tags already in there (including the<script></script>tags with which we have been working so far)!
The above is largely boilerplate code from Firebase, and so you do not need to spend time understanding it (though if you do have questions, feel free to ask) - it simply connects your web page to the database and provides functions to add data to the database (pushToDatabase()) and remove it again (dropFromDatabase()). Once you have pasted this in - you can safely just ignore it!
One thing that you must do for this to work, however, is to create a global variable called userName and populate it with your name:
let userName = "jonnyhuck"; // this is your name (used to organise the database)
Add the above snippet to the original
<script></script>tags at the appropriate location for creating global variablesReplace
jonnyhuckwith your own name (with no spaces) - be careful not to lose the speech marks!
This will mean that your data are stored in my database, but against your username, so that you can see your data going in there if you wish!
All that we need to do now is add some code to our spray() function to load each new point into the database, and then to our clear() function to remove all of the current data from the database.
Adding data to the database
In the case of adding data to the database, we want to use a standard format, so that we can easily import our data into other platforms, and so that it could easily be used by others. Fortunately, Turf already stores its data in the widely used GeoJSON format, which is ideal for this task! We therefore simply want to create a turf.point object to save in our database. Alongside the location, we will also add a property (sometimes called an attribute in GIS) to each point describing the time at which it was created, which we will store inside the GeoJSON object as a timestamp. A timestamp in JavaScript is simply the number of milliseconds since midnight on 1st Jan 1970 (an arbitrary time that was before anyone would have been using JavaScript). To illustrate what this looks like, here is the current time represented as a timestamp (using a recursive function…):
Can you see how that works? The timestamp is simply a counter that has been running since 1/1/1970, 00:00:00.
We can make our turf.point object, including the timestamp property as shown in the first line below, and then push it into the database (remember, to push something is to add it to a collection, just like with the array above) using the second line. Adding something to the database in this way returns a unique ID for the new entry in the database, which we store in dbID):
                // assemble a GeoJSON object using your random position
                const geoPoint = turf.point(randomPosition, {'timestamp': Date.now()});

                // push the data into the database, and get the ID of this entry
                const dbID = pushToDatabase(geoPoint);
Make sure that the above snippet makes sense (ask if you aren’t sure!), then add it to a suitable location in your
spray()function
Now, if all has gone to plan, everything that you spray onto the map will appear in the database!
However, if we click the “Clear Spray” button, the circles will be removed from the map, but the points will not be removed from the database, which is no good - so we aren’t finished yet…
Removing data from the database
Removing our data from the database is very similar to removing it from the map - it is so similar, in fact, that we can do it using the same for loop! Here is how:
- Each entry in the database has a unique identifier, we need to keep track of them with an array, just like we do with the
L.circleobjects that we add to the map. - To delete them, we then pass each of these identifiers to the
dropFromDatabase()function, which will find it in the database and remove it for us. - Finally, we set our array to be empty (just like with the
paintarray)
Here we go:
Add an empty array called
dbIDsas a global variable in your code - this is exactly the same as when you did this for yourpaintvariable
Now, we simply need to add each database ID to this array, immediately after we load a point into the database:
In the
spray()function,push()thedbIDto thedbIDsarray immediately after we get it - again, this is exactly the same as you did with pushingcircleinto thepaintarray.
At this point, we should have a list of all of our ids. If you like, you can test this with something like
console.log(dbIDs);
Make sure that this is working as expected - the list should get longer with each circle added to the map
Once this works, we simply need to use that list to remove the data from the database again:
Add the following line inside the
forloop in yourclear()function, so that each data point in thedbIDsarray is removed from the database
                    // remove point from database
                    dropFromDatabase(dbIDs[i]);
Then, add a line at the end of this function to empty the
dbIDsarray, exactly as you did with thepaintone.
If all has gone to plan, you should be able to see the data appearing in the database and then disappearing again - not bad eh!
If you are struggling to get this to work - feel free to check out the solution here!
8. What next…?
This is the end of the material that I have prepared for today, but there is lots more that you could do yourself if you wanted to continue to extend this to make it closer to map-me! For example, obvious additions might be:
- Adding the ability to turn the spraycan on or off, so that the user can drag ther map around
- Adding the ability for the user to adjust the spraycan radius, paint size and colour
- Making the spray distribution circular
- Making spray data relate to the specific participant, rather than simply to you
- Allowing the user to add text to the spray to explain what they were thinking
- Anything else that you can think of…!
The End
I hope that this practical has given you the basic understanding of how you can create your own map interfaces for participatory GIS surveys. Remember the Hammer of GIS: the methods that you use should always be determined by the research; the research should not be determined by the tools available!!
Thanks for taking part,
Jonny & Timna